一、安装 Git
- Windows:下载并安装 Git.
- Mac:使用 Homebrew, MacPorts 或者下载 安装程序。
- Linux (Ubuntu, Debian):
sudo apt-get install git-core - Linux (Fedora, Red Hat, CentOS):
sudo yum install git-core
二、设置 Git
如果需要使用 SSH 协议连接
添加 SSH-Key
ssh-keygen -t rsa -C "[email protected]" # 第一次添加,key generator(密匙生成器)、rsa 一种算法 |
SSH Key 是一对,分为私钥和公钥,是非对称加密,当本地仓库需要往远程仓库 push 时,私钥加密传输内容,而只有对应的公钥才能解密,所以远程仓库需要添加公钥。
一台电脑要连多个远程仓库,可以就用一对 SSH Key。如果在一台电脑上,要为不同远程仓库对应不同私钥时,需要新增 config 文件,为不同远程仓库指定使用不同的私钥。
# 第一个账号,默认使用的账号 |
- 原理分析:本地 SSH 客户端(Git)使用类似
[email protected]:deppwang/deppwang.github.io.git地址来连接远程仓库(可通过git remote命令查看)。@后面跟的是Host,@github.com代表使用 id_rsa 这个私钥
测试 SSH-Key
# 清空本地的 SSH 缓存,添加新的 SSH 密钥 到 SSH agent 中 |
用户配置
# 全局配置 用户名 / 邮箱 |
git config --list # 查看当前仓库所有配置 |
LF 与 CRLF
- LF (Line Feed) 代表换行,对应字符
\n,Unix 系统使用;CR(Carriage Return) ,CRLF 对应字符\r,Windows 系统使用标准化 指在提交代码到 Git 版本库中时,将文本文件中的换行符 CRLF 转为 LF 的过程
转换 指在检出 Git 版本库代码过程中,将文本文件中的换行符 LF 转换为 CRLF 的过程
git config --global core.autocrlf [true | input | false] # 全局设置 |
- true 自动完成标准化与转换
- input 只做标准化操作,不做转换操作
- false 提交与检出的代码都保持文件原有的换行符不变
Git 安装后默认为 false,常用设置:
git config --global core.autocrlf true # Windows |
配置别名
git config --global alias.st status |
三、常用命令
远程
git remote add origin [email protected]:username/repo.git # 关联远程库,可关联多个 |
常规
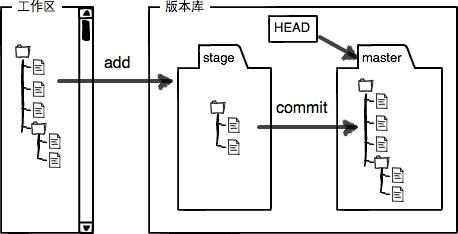
git add . /git add -A /git add --all # 添加所有的文件 |
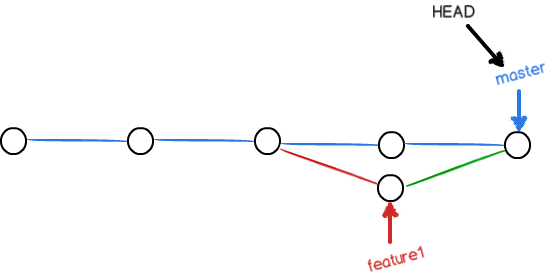
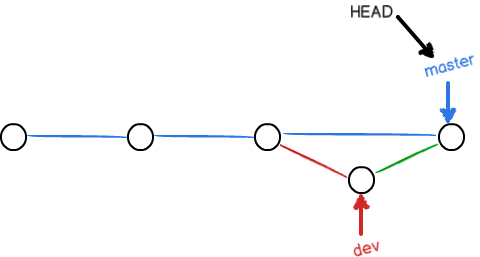
分支
git br dev # 创建分支 |
撤销、删除与回退
git co -- <file> # 把文件在工作区的修改全部撤销掉(回到最近 git commit 或 git add 时的状态) |
储藏
git stash save "message" # 把未提交的,当前现场「储藏」起来。 |
标签
git tag <name> # 打标签 |
.gitignore
# 忽略除 .sh/.py 结尾的其他文件 |
项目协作时,本地修改某个文件,但不想将修改提交到远程。可以使用 「skip-worktree」来关闭 GIT 跟踪本地文件修改
git update-index --skip-worktree /Users/yanjie/Workspace/medweb/.PYTHON.sh |
Commit
git ci -m "Article updated: `date +'% Y-% m-% d % H:% M:% S'`" # Article updated: 2019-05-29 21:11:06 |
IDEA Git
- IDEA 版本控制是默认记录工作区和暂存区与分支上的不同,即:直接修改工作区的内容,不同;add 到暂存区后,还是不同
- IDEA 可以直接 commit 文件而不用 add,可以理解为默认帮助 add
- IDEA 的 revert 相当
git co -- file - 修改 commit 描述:
Undo commit
四、原理
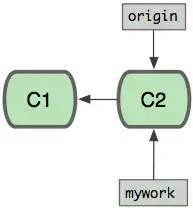
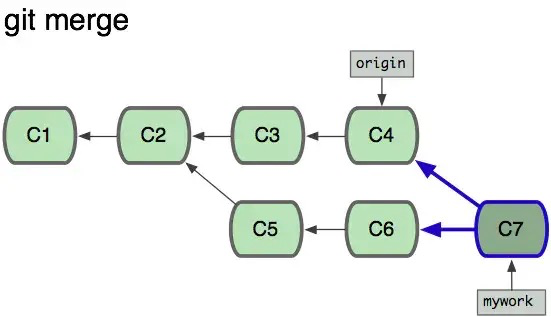
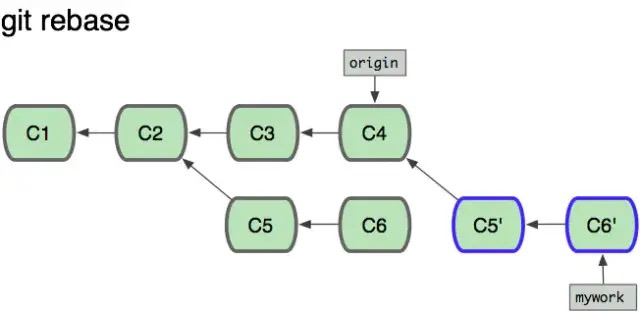
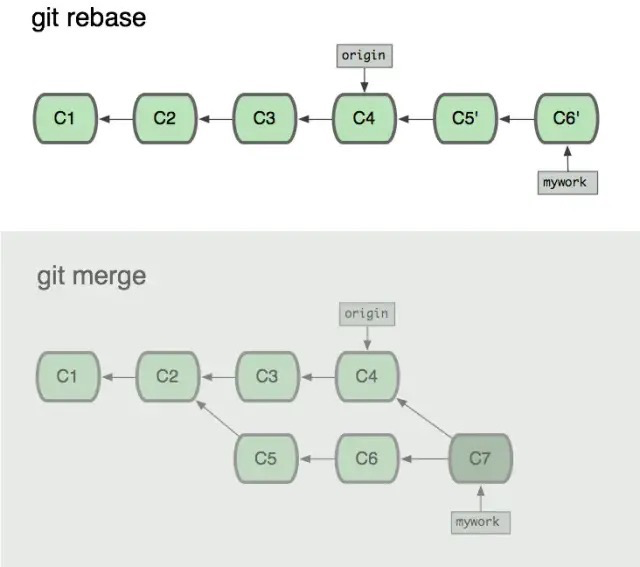
Rebase